To connect a blog with a group, go to you group home page and click “Admin” (yes, you need to be an administrator of the group to do this):

- Red circle highlights admin button on group interface (available only to group admins). Click for larger view.

Click on group blog link:

- Click on the Group Blog link. (click image for larger view)

Check the box next to “enable group blog”:

- Check “enable group blog”. (click image for larger view)

Decide to start a new blog or connect an existing one to your group. Enable member posting if you want your group members to be authors on the blog. You will also be asked to set WordPress roles for administrators, moderators and members.
A bit about the WPMU member roles:
- Administrator – Somebody who has access to all the administration features.
- Editor – Somebody who can publish posts, manage posts as well as manage other people’s posts, etc.
- Author – Somebody who can publish and manage their own posts.
- Contributor – Somebody who can write and manage their posts but not publish posts.
- Subscriber – Somebody who can read comments/comment/receive news letters, etc.
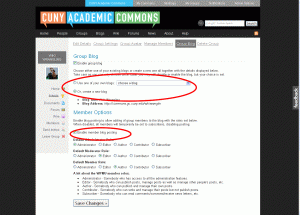
- Choose a blog for the group and enable member posting

Click “Save Changes” and the “Blog” link should now appear on the left navigation area of the group.
Comments are closed.